Getting Started with Nginx on Linux: a Complete Tutorial

Nginx
Nginx pronounced Engine-Ex, is a popular and open-source, lightweight, and high-performance web server software that also acts as a reverse proxy, load balancer, mail proxy, and HTTP cache. Nginx is easy to configure in order to serve static web content or to act as a proxy server.It can be deployed to also serve dynamic content on the network using FastCGI, SCGI handlers for scripts, WSGI application servers or Phusion Passenger modules, and it can serve as a software load balancer. Nginx uses an asynchronous event-driven approach, rather than threads, to handle requests. Nginx's modular event-driven architecture can provide predictable performance under high loads.
In this tutorial, we are going to get started with Nginx on Linux and use the terminal commands to install and configure a test on it. You will get familiar with all the codes and commands for setting Nginx up and running on your operating system.
What you need to get started:
1. This tutorial is based on Linux. If you are working with Ubuntu 20.04 Linux or Linux Mint, or any other OS of the Linux family, you have a suitable operating system for the following tutorial.
2. A user account with sudo or root privileges.
3. Access to a terminal window/command line
Getting Started with Nginx
1. Installation
First off, you need to update software repositories. This helps make sure that the latest updates and patches are installed.
Open a terminal window and enter the following:
Coppied to clipboard.
sudo apt-get update
Now, to install Nginx from Ubuntu repository, enter the following command in the terminal:
Coppied to clipboard.
sudo apt-get install nginx
If you are on Fedora, you should instead enter this command to install Nginx.
Coppied to clipboard.
sudo dnf install nginx
And if you are on CentOS or RHEL, the installation is done using this command:
Coppied to clipboard.
sudo yum install epel-release && yum install nginx
finally, we test the installation success by entering:
Coppied to clipboard.
nginx -v
If the installation has been successful, You should get a result like this:
Coppied to clipboard.
nginx version: nginx/1.18.0 (Ubuntu)
2. Controlling the Nginx Service
Next, we should get familiar with the controlling commands. Using these commands, you will be able to start, enable, stop and disable the Nginx. First off, we should check the status of Nginx service. To do so, you can use the following command:
Coppied to clipboard.
sudo systemctl status nginx
And you can see the result:
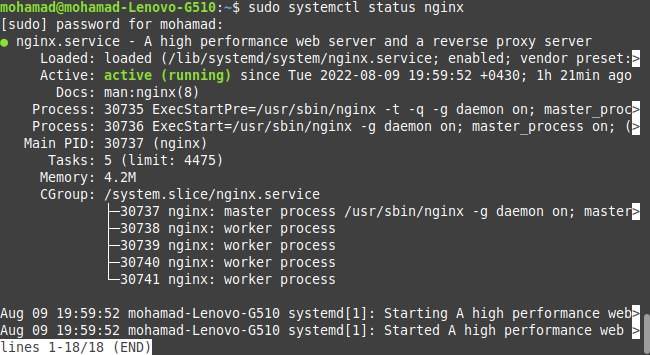
As you can it is activated and up and running. If it is not activated, you can first start by entering this command in the terminal:
Coppied to clipboard.
sudo systemctl start nginx
And then, you will be able to enable it using the following command:
Coppied to clipboard.
sudo systemctl enable nginx
If you want to stop the Nginx web service, you can first stop it:
Coppied to clipboard.
sudo systemctl stop nginx
And then disable it:
Coppied to clipboard.
sudo systemctl disable nginx
Also, if you want to reload the Nginx web service, you can use the following command:
Coppied to clipboard.
sudo systemctl reload nginx
And for a hard restart, there is a command as below:
Coppied to clipboard.
sudo systemctl restart nginx
3. UnComplicated Firewall Commands:
Nginx needs access through the system’s firewall. To do this, Nginx installs a set of profiles for the Ubuntu default ufw (Uncomplicated Firewall). To display the available Nginx profiles use this command:
Coppied to clipboard.
sudo ufw app list
And you can see the result. Neglect the results other than that of Nginx.

To get Nginx access through the default Ubuntu firewall, enter the following:
Coppied to clipboard.
sudo ufw allow 'nginx http'
Then you need to refresh the firewall settings by entering:
Coppied to clipboard.
sudo ufw reload
For https traffic, enter:
Coppied to clipboard.
sudo ufw allow 'nginx https'
And for both you can use:
Coppied to clipboard.
sudo ufw allow 'nginx full'
4. Running a Test
To begin running a test, you should first make sure that the Nginx service is running, by checking the status as mentioned earlier. Open a web browser, and enter the following web address:
Coppied to clipboard.
http://127.0.0.1
And you should be able to see the following result containing a page with a welcome statement.

Now, if the system does not have a graphical interface, the Nginx Welcome page can be loaded in the terminal using curl:
Coppied to clipboard.
sudo apt-get install curl
By entering the following command, you should be able to see the Welcome page contents in the terminal:
Coppied to clipboard.
curl 127.0.0.1
And the result is as expected:
 Download this Article in PDF format

Arashtad Custom Services
In Arashtad, we have gathered a professional team of developers who are working in fields such as 3D websites, 3D games, metaverses, and other types of WebGL and 3D applications as well as blockchain developemnet.
Visit Our Services
Arashtad Serivces
Drop us a message and tell us about your ideas.
Fill in the Form
Blockchain Development
https://blog.arashtad.com/blog/getting-started-with-nginx-on-linux-a-complete-tutorial/


Comments
Post a Comment